EDITORIAL CHECK
Source and Review Basis
Gyeongbokgung guides are checked against official palace and Seoul tourism references for hours, closed days, admission conditions, hanbok entry, and route decisions that affect a real visit.
The best photo spots in Gyeongbokgung are easier to choose when you stop treating the whole site as one generic backdrop. This guide is built for visitors who want a clearer photo route, better timing choices, and easier first-stop decisions for hanbok photos in Gyeongbokgung. If you want the broader Seoul context first, start with Gyeongbokgung Palace Tour Guide — Route and Visit Basics before narrowing down your shooting route.
— Choosing photo spots in Gyeongbokgung first
- Best time: earlier hours or later afternoon make it easier to shoot without the heaviest crowd pressure.
- Crowd strategy: start with the main axis for the signature frame, then move slightly off-center when the front view gets busy.
- Route logic: many first-time visitors do best by starting on the main axis, moving to Geunjeongjeon for portraits, and finishing at calmer zones such as Gyeonghoeru or Hyangwonjeong.
Those checks matter because Gyeongbokgung is large enough that photo planning and movement planning overlap. Once you know what kind of frame you want first, the palace becomes much easier to navigate with a camera.
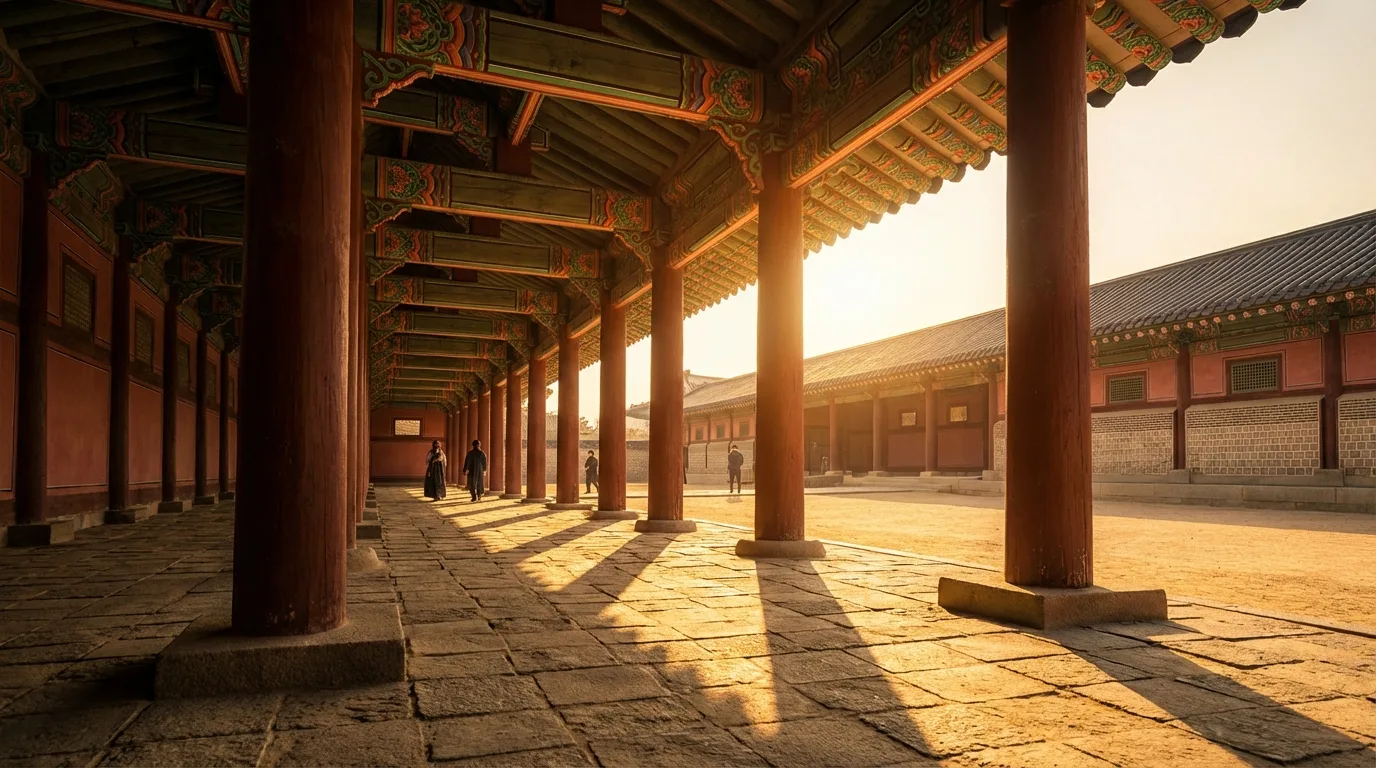
— The main axis comes first in Gyeongbokgung
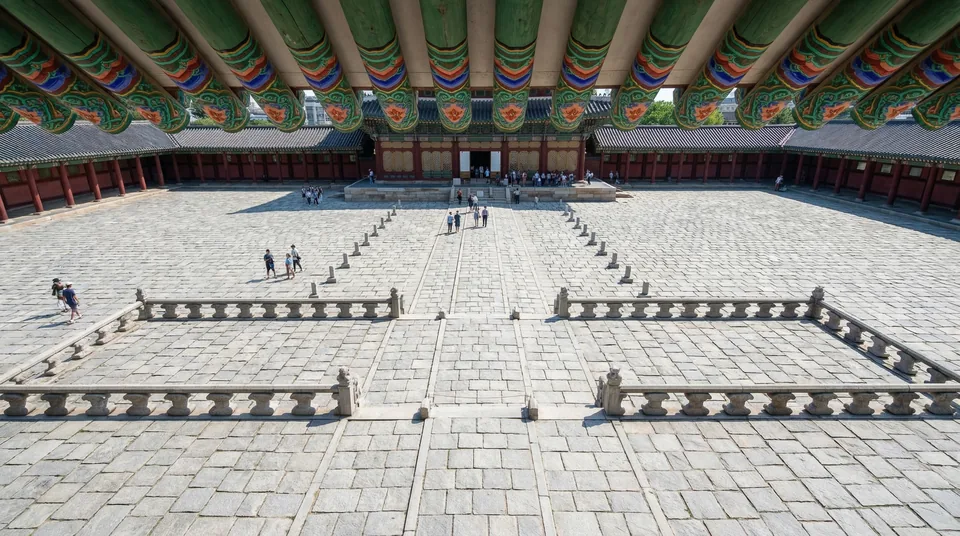
The stretch from Gwanghwamun through Heungnyemun toward Geunjeongjeon is the most recognizable part of the palace, which is why it belongs at the top of any list of best photo spots in Gyeongbokgung Palace. The repeated gates, widening courts, and mountain-backed alignment create the clearest answer to what royal Seoul is supposed to look like in one frame.
This area also works well for visitors who want a strong image quickly. The architecture already organizes the shot, so even simple compositions feel intentional. If you only have time for one signature frame, this is the safest place to begin because it delivers the most legible Seoul palace photo spot without much trial and error.
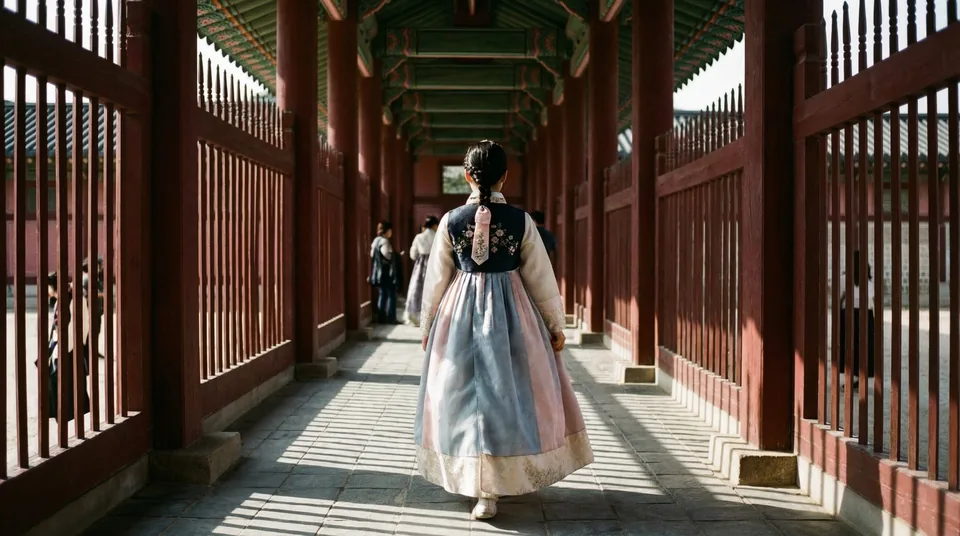
— Geunjeongjeon works especially well for hanbok photos
Geunjeongjeon courtyard is one of the most reliable areas for hanbok photos in Gyeongbokgung because the open stone ground gives portraits enough space to breathe. Behind the subject, the steps, columns, and rooflines build a clear hierarchy, which helps clothing, posture, and setting read together instead of competing inside the frame.
It is also forgiving for people who are not confident with posing or camera angles. Because the space is frontal and symmetrical, even small shifts in position keep the image balanced. When the center is crowded, step slightly off-axis and use a doorway or column line to build a cleaner frame while keeping the palace mood intact.
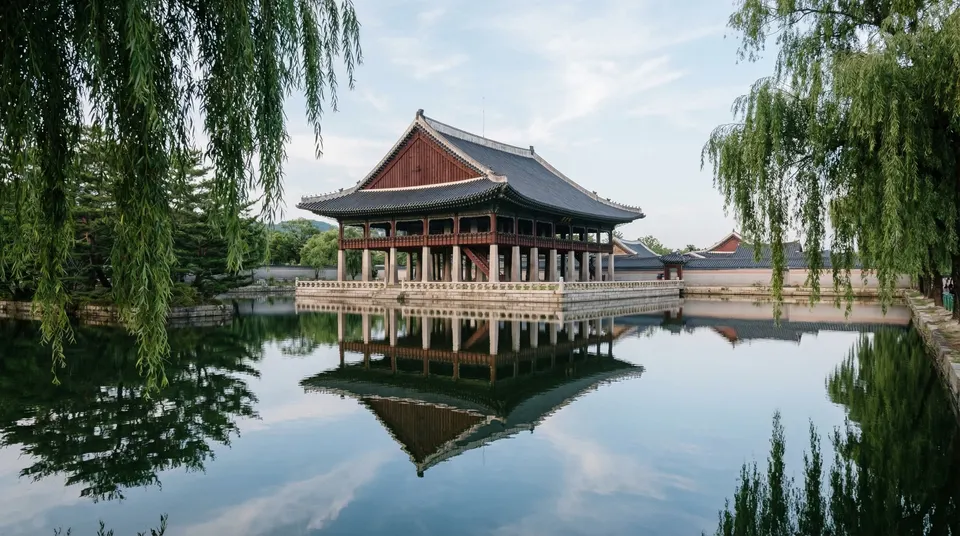
— Gyeonghoeru as one of the best angles in Gyeongbokgung Palace
Gyeonghoeru is memorable less because it overwhelms the frame and more because it gives the scene room to breathe. Water, railing lines, sky, and the raised pavilion create a composition that feels measured and calm, which makes it one of the best angles in Gyeongbokgung Palace for visitors who want something softer than the main ceremonial axis.
The strongest compositions here come from stepping back. A little distance lets the pavilion sit inside the landscape instead of flattening it into a close monument shot. If the main axis communicates authority, Gyeonghoeru shows why the palace also works as a place of balance and pause.
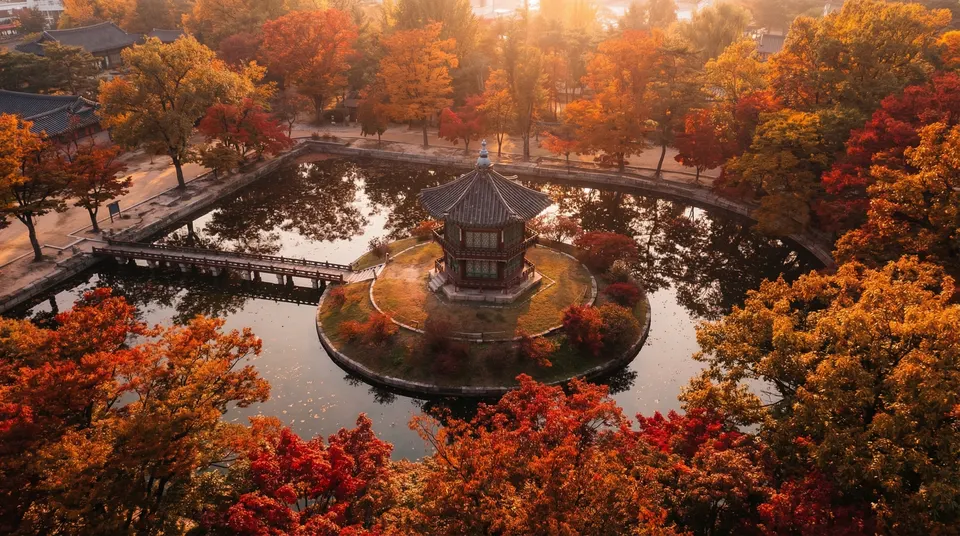
— Softer mood photo spots in Gyeongbokgung
Hyangwonjeong and the surrounding pond area answer a different question: where to take photos in Gyeongbokgung when you want a quieter, more intimate traditional mood. The bridge, pavilion, and layered textures around the water make this part of the complex feel less formal and more reflective than the front courts.
That changes how you should use the space. Walking shots, side profiles, and outward-looking poses tend to work better than rigid front-facing portraits. If you want to extend that quieter mood outside the palace walls, Hanok Photo Spots Near Gyeongbokgung: Alley Guide is the most natural next route.
— The same Gyeongbokgung photo spots change by time
Timing changes the best photo spots in Gyeongbokgung Palace almost as much as location does. Earlier hours make lines, colors, and painted details easier to read, which is useful when you want representative images. Later light adds longer shadows and more depth, especially around gates and columned spaces, so the same zone can feel more dramatic without moving very far.
The most efficient route for many visitors is to start on the main axis, move to Geunjeongjeon for portraits, and then finish at Gyeonghoeru or Hyangwonjeong for a softer final set of frames. For a more detailed breakdown of light direction and schedule, continue to Best Time to Photograph Gyeongbokgung: Light Guide.
Seasonal changes across spring, summer, fall, and winter in Gyeongbokgung photos
Season changes the palace more than many first-time visitors expect because the same architecture starts interacting with very different color temperatures and crowd patterns. Spring is the easiest season for soft traditional portraits because pale blossom tones around the grounds reduce the severity of stone and wood, but it is also the season when popular angles fill up fast. Fall gives the cleanest color contrast for hanbok photos because reds, mustard tones, and deeper roof colors read strongly together. Summer can feel greener and fuller, though humidity sometimes flattens distant detail and makes midday portraits harder to keep crisp. Winter is the most stripped-back version of the palace, which can be excellent if you want colder symmetry, visible breath, and cleaner architectural lines without leaf cover.
The practical consequence is simple: do not use the same route with the same expectations in every season. In blossom season, move earlier and finish the iconic courts first before the crowd builds. In summer, protect your portrait session from midday glare and use more shaded transitions between the main courts and calmer side zones. In autumn, let the leaf color become part of the frame instead of treating it as background only. In winter, pay more attention to open courtyards and roofline contrast because bare branches and pale light can make the ceremonial spaces look exceptionally graphic.
How should you read light direction before stopping for a portrait
One of the easiest mistakes in Gyeongbokgung is stopping at a famous spot without checking where the light is actually landing. The courtyard may be impressive, but if the face is in harsh overhead contrast and the roof detail is blown out, the result looks far less refined than the location deserves. On the main axis, front-facing portraits read best when the light is still angled enough to model the face gently instead of flattening it. Around Geunjeongjeon, side steps and slight off-center positions help more than a strict dead-center stance because they preserve the architecture while giving the subject more dimensional light.
This is also where first-time visitors waste time by repeating nearly identical angles. If the sun is high and the central court feels too bright, move to a gateway threshold, a side wall line, or a column rhythm where shadow creates a cleaner edge. Gyeonghoeru and Hyangwonjeong reward patience even more. Reflections become stronger when the water surface stays calm and the pavilion is not fighting direct glare. Smartphone users should avoid shooting straight into bright reflective water unless they want silhouette effect, while camera users with a longer lens can isolate the pavilion and reduce distracting brightness more easily.
A beginner route that works when you only have ninety minutes
If this is your first visit and you do not want the palace to become one long detour, use a route that separates signature frames, portrait frames, and quieter mood frames. Enter with the intention of securing the main-axis image first. That removes the pressure of chasing the most famous view later when the crowd feels worse. From there, move to Geunjeongjeon while your clothing and pose still look fresh. This is the best point for the structured hanbok portrait that many visitors specifically came for.
After that, stop trying to collect every courtyard. Shift toward Gyeonghoeru for broader composition and then decide whether you still have time and energy for Hyangwonjeong. That final section gives the set more variety because it breaks the pattern of large ceremonial stone spaces. If you are traveling with someone who is not interested in long photo sessions, this route also works socially: the first half feels iconic and efficient, while the second half slows down only after the must-have images are already done.
If you rented hanbok or have a fixed next stop, plan the exit direction before you go too deep into the grounds. Walking back from the inner ponds to the front gate can take longer than expected when crowds slow the path. In that case, finish the required portrait near Geunjeongjeon first, then use only one quieter stop before returning toward the rental shop, restaurant, or subway route. A good photo route is not just a list of pretty places; it has to end without making the rest of the day collapse.
What should you do when the famous courts are too crowded
Crowd management matters in Gyeongbokgung because the most recognizable spaces are also the easiest for visitors to pile into. The main mistake is waiting too long at the exact center while more people keep entering the frame. A stronger result comes from stepping half a lane off the center, letting the columns repeat behind the subject, and shooting during brief gaps rather than demanding an empty court that never comes. The palace still reads clearly even when the frame is not perfectly symmetrical.
It also helps to work in short bursts. Watch how tour groups move, wait for one lane to clear, shoot quickly, and then move on before the next wave arrives. If the center of Geunjeongjeon is unusable, use the stairs, the side of the courtyard, or a threshold view from slightly farther back. If Gyeonghoeru feels crowded near the most obvious railing edge, step away from the cluster and use a quieter side angle where the pavilion sits more softly inside the landscape. A photo route in Gyeongbokgung becomes much smoother once you stop treating the busiest angle as the only valid angle.
What changes between smartphone framing and camera framing inside the palace
Smartphones generally work best in Gyeongbokgung when you emphasize clean lines, generous negative space, and one clear subject-background relationship. The wide lens can easily make the palace look empty in the wrong way if the subject stands too far away, so move closer and let one gate, roofline, or court edge organize the image. Portrait mode can help at Geunjeongjeon and in quieter side zones, but it can struggle with dense roof details or fine railing lines, so the safest results come from simple framing and strong positioning rather than excessive effect.
Dedicated cameras give you more control over compression and distance. A moderate zoom makes Gyeonghoeru feel calmer by trimming the empty edges around the pavilion, and it can help isolate repeated columns around the main courts without forcing the subject too close to the camera. Even so, better equipment does not replace route discipline. The visitors who leave with the strongest palace photos are the ones who know when to stop, when to move, and which kind of frame each zone actually supports.
Start with the main axis if you want the most recognizable Gyeongbokgung Palace frame in the shortest time.
Use Geunjeongjeon for structured portraits and hanbok photos, then move to Gyeonghoeru or Hyangwonjeong for softer mood.
Light changes the same palace scene dramatically, so location and timing should be planned together.
💡 Editor's Real-Life Tip
From my own experience exploring Seoul, you don't always need to follow the exact trendy path. Sometimes the best spots are just one alley away from the main streets. Make sure to check the weather and operating hours in advance, as they can change without notice!
| Checklist | Importance | Editor's Note | |---|---|---| | Timing | ⭐⭐⭐⭐⭐ | Beat the crowds by going early! | | Weather | ⭐⭐⭐⭐ | Totally changes the vibe of your photos. | | Comfort | ⭐⭐⭐⭐⭐ | You will walk A LOT in Seoul. |